AGENTIC ENGINEERING
How to Build an AI-Powered Support Ticket Triage Workflow with Orkes Conductor

Maria Shimkovska
Content Engineer
Last updated: March 17, 2026
March 17, 2026
8 min read


Mar 24, 2026
Jan 19, 2026
Mar 17, 2026
Join thousands of developers building the future with Orkes.
Learn what agentic workflows are through a real life pain point example. And a pretty simple one actually - automating technical support ticket routing/triaging.
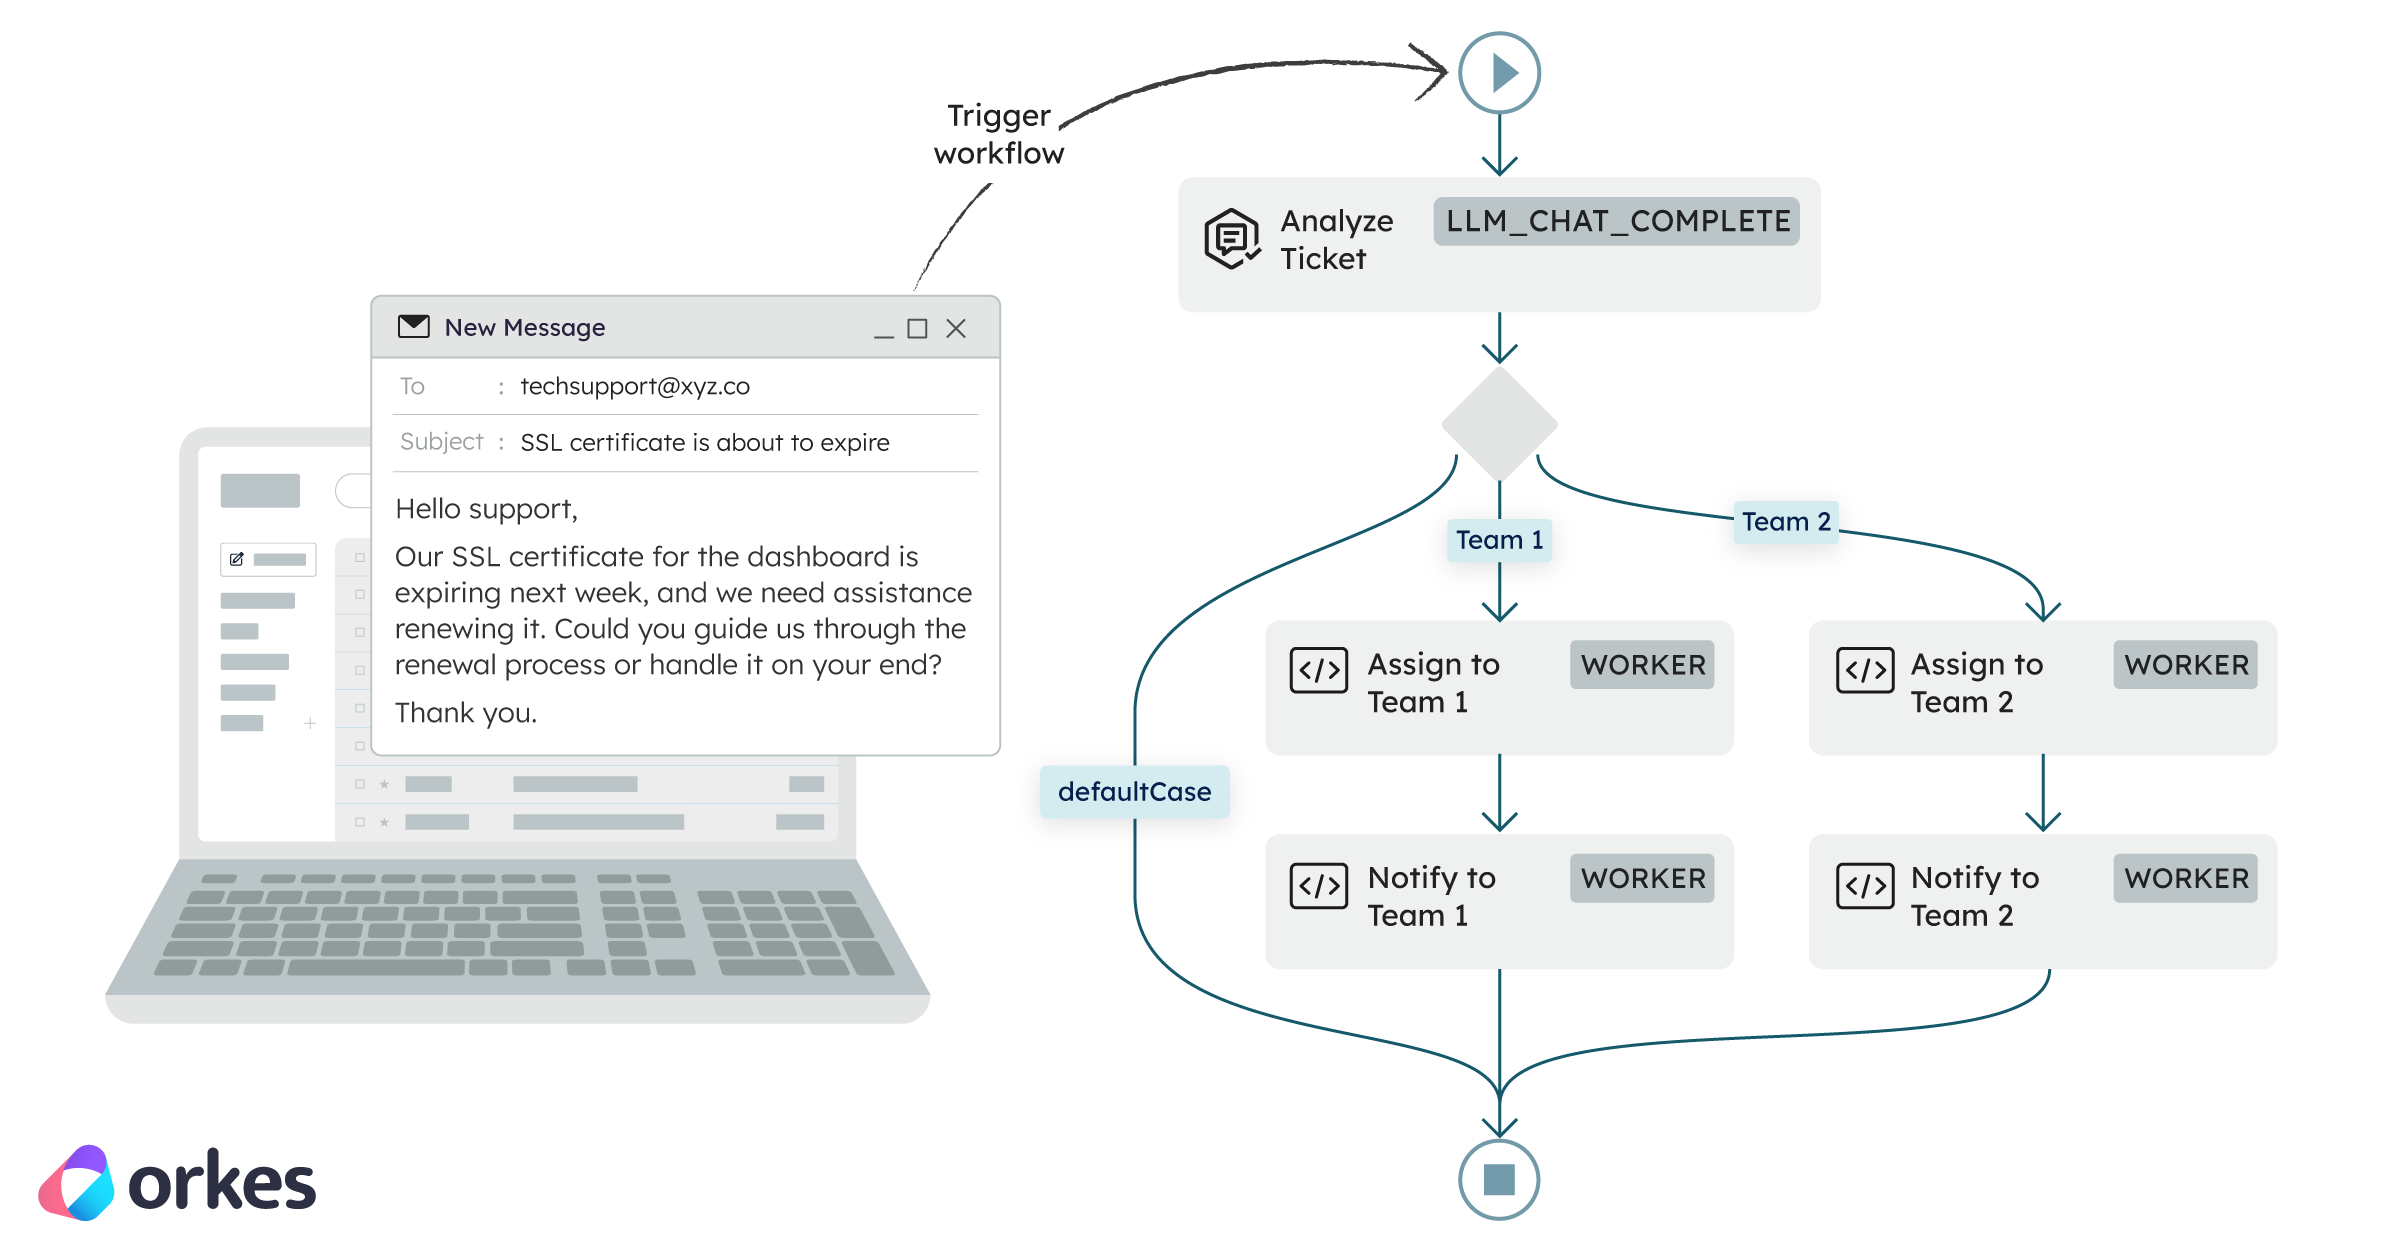
This support ticket triage automation workflow uses AI to read support emails customers send, pull out important details (like what the email is about), and send each ticket to the right team automatically, so you don't have to do any of this manually.
In the below illustration you can see how a customer email can trigger a workflow to start on the backend to automatically route the contents to the right team.
This one is for developers who are curious about agentic workflows and want to see how you can build out a real and practical use case.
The example is a support ticket triage, which is a genuine pain point that most teams run into at some point.
I'll show you how to automate it using an agentic workflow where AI handles one specific step.
Worth saying: you don't always need a full AI agent to get value from AI. Sometimes something like a focused workflow with an LLM at the right step is all you need, which is also much faster to build and ship.
Orkes Conductor is built for both kinds of use cases, and this is a great place to start if you're kind of new to how you can incorporate AI in your own pain points.
When you have email support for customers someone has to manually read and forward them. I've heard about teams spending a lot more time than they want on just sorting emails and creating tickets for issues customers have.
I’m going to show you how to build a fully automated triage workflow using Orkes Conductor and OpenAI (though you can totally use any LLM provider you want). As part of the workflow, an AI step reads the email and figures out what it’s about. The next workflow step then takes that information, routes it to the right team, runs the right tasks, and handles retries if anything goes wrong.
If you’re newer to Orkes Conductor, this is also a great first workflow to build or to just read how it's built. I'll cover core concepts like task definitions, workflow definitions, workers (essentually just your own code), and branching logic, all in a problem that’s pretty easy to follow from start to finish.

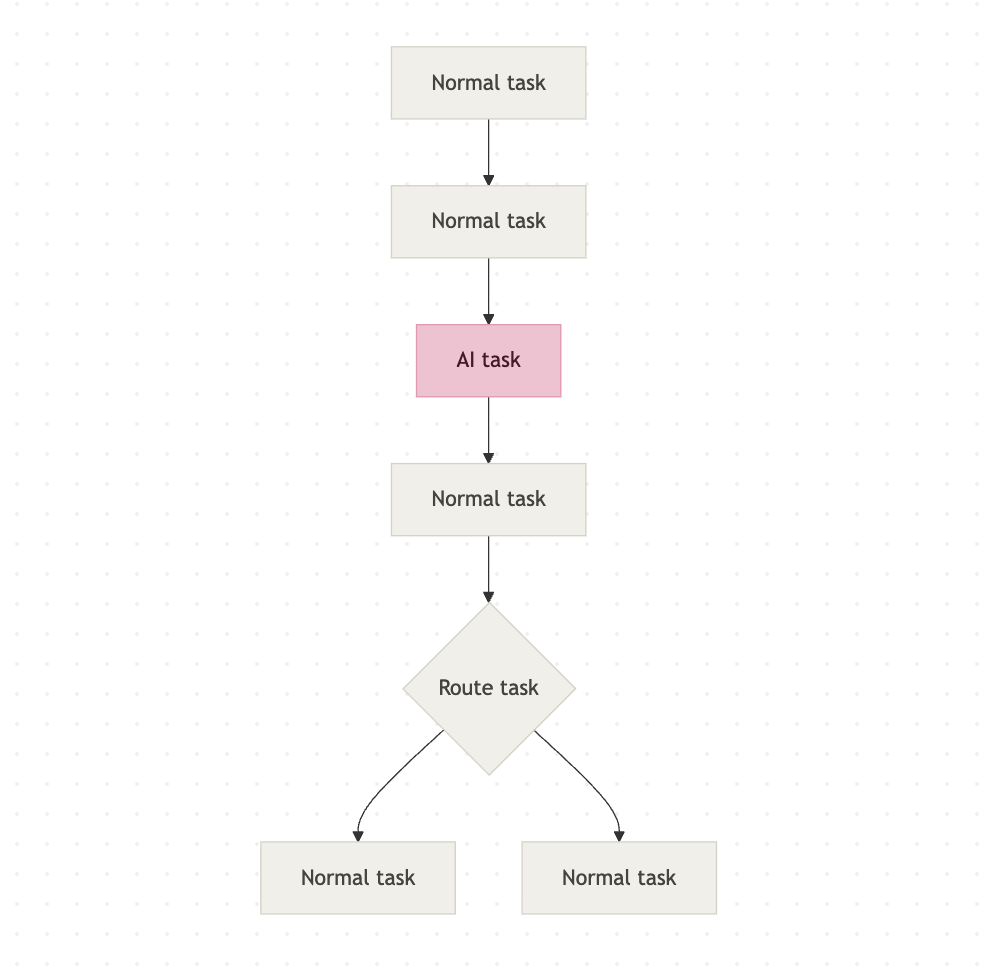
An agentic workflow is a workflow where at least one step is an AI step. It's a structured process where AI plays a specific, contained role. In our case, that role is reading an email and figuring out what it's about.
Here is an illustration showing an agentic workflow:
An orchestration platform is what manages the workflow itself. It decides which tasks run, in what order, and what happens if something fails. You'll see online it being described as the conductor of an orchestra: the musicians (your tasks) do the actual work, but the conductor makes sure everyone plays at the right time and in the right order. I also think of it like a pupper master.
Orkes Conductor is that orchestration platform. It handles the workflow logic, the retries, the branching, and the execution history. You bring the tasks (although Orkes Conductor has a lot built in as well). Conductor keeps everything running in the right order.
You can. And yes, you can absolutely call an LLM from a script too. Nothing stops you from doing that, and a lot of people start there. The problem is what comes next. Once you add an LLM call to a script, you also need to handle what happens when the API times out, or when the model returns something unexpected, or when a task halfway through fails and you have no idea what already ran. So you start writing retry logic. Then you add some logging. Then you need to track the state of a given execution so you add that too. Before long you are maintaining a homegrown orchestrator on top of the actual thing you were trying to build.
A lot of teams go down this road and eventually hit a wall. The orchestration code becomes its own maintenance burden, it is hard to hand off to another engineer, and debugging a failure means digging through logs instead of looking at a clear execution history.
That is the specific problem orchestration platforms like Orkes Conductor exist to solve. Retries, observability, branching logic, execution history, task ordering: all of that comes built in. You can open the Conductor UI, find any execution, and see exactly which tasks ran, what they returned, and where something failed. It basically saves you a ton of time and resources. This is why folks turn to orchestrators more and more. Especially now that automation is getting more of a spotlight.
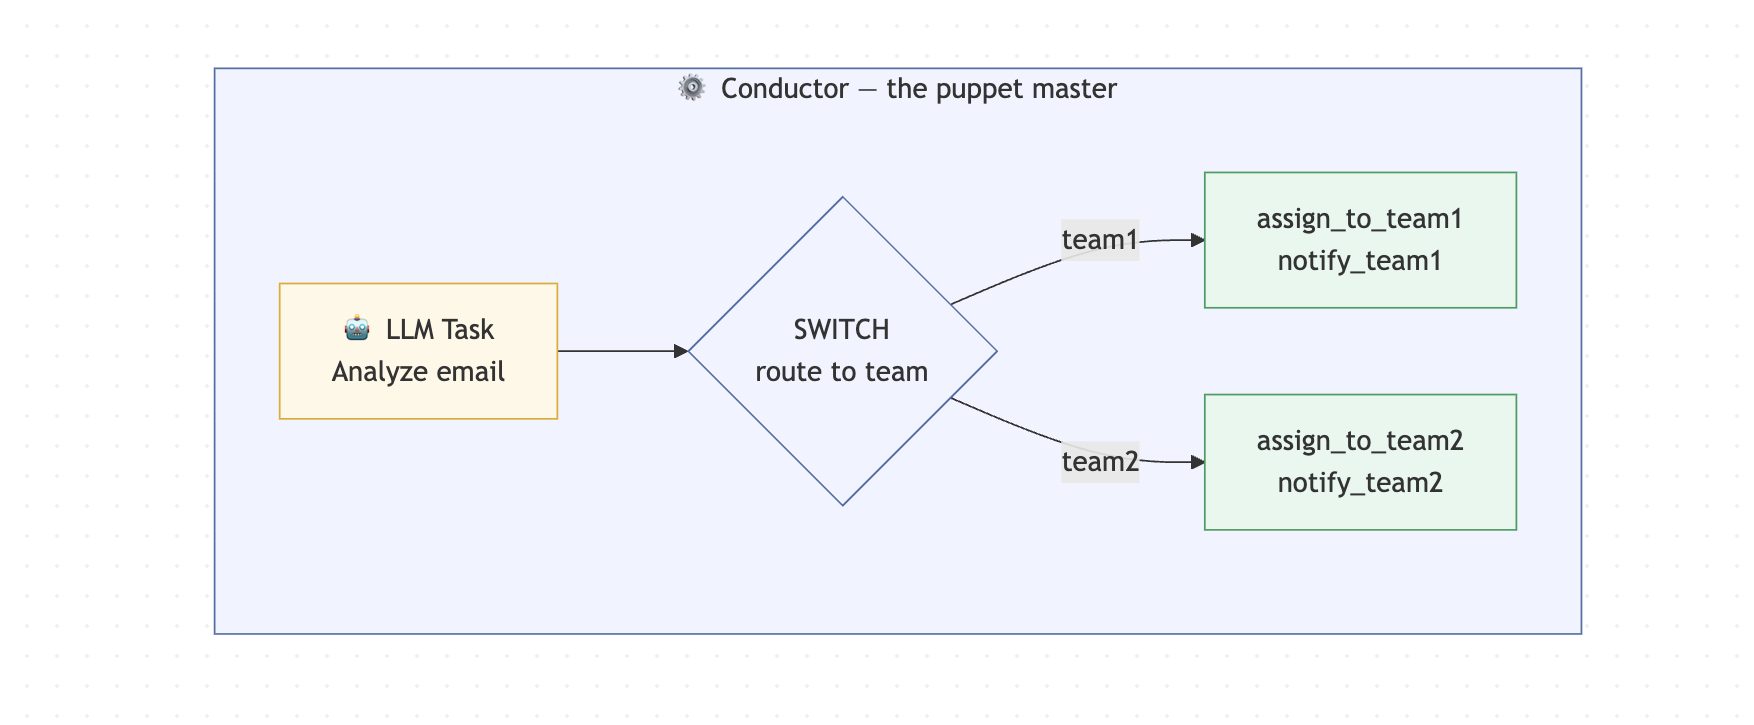
An email comes in and kicks off a workflow on the backend. An AI step reads the email contents, figures out what it's about, and routes it to the right support team automatically.
Two teams in this example:
The routing logic is simple:
Customer Email
      |
[AI task]              <- AI reads email, returns JSON with routingKey
      |
[Route task]           <- Conductor routes based on routingKey
   /        \
[Team 1]   [Team 2]
assign      assign
notify      notify
The key design decision here is that the AI does one thing only: read the email and return structured data. It has no say in what happens next. Conductor owns that. This is what keeps the whole system predictable. The AI can be wrong or unpredictable, but the workflow logic never is.
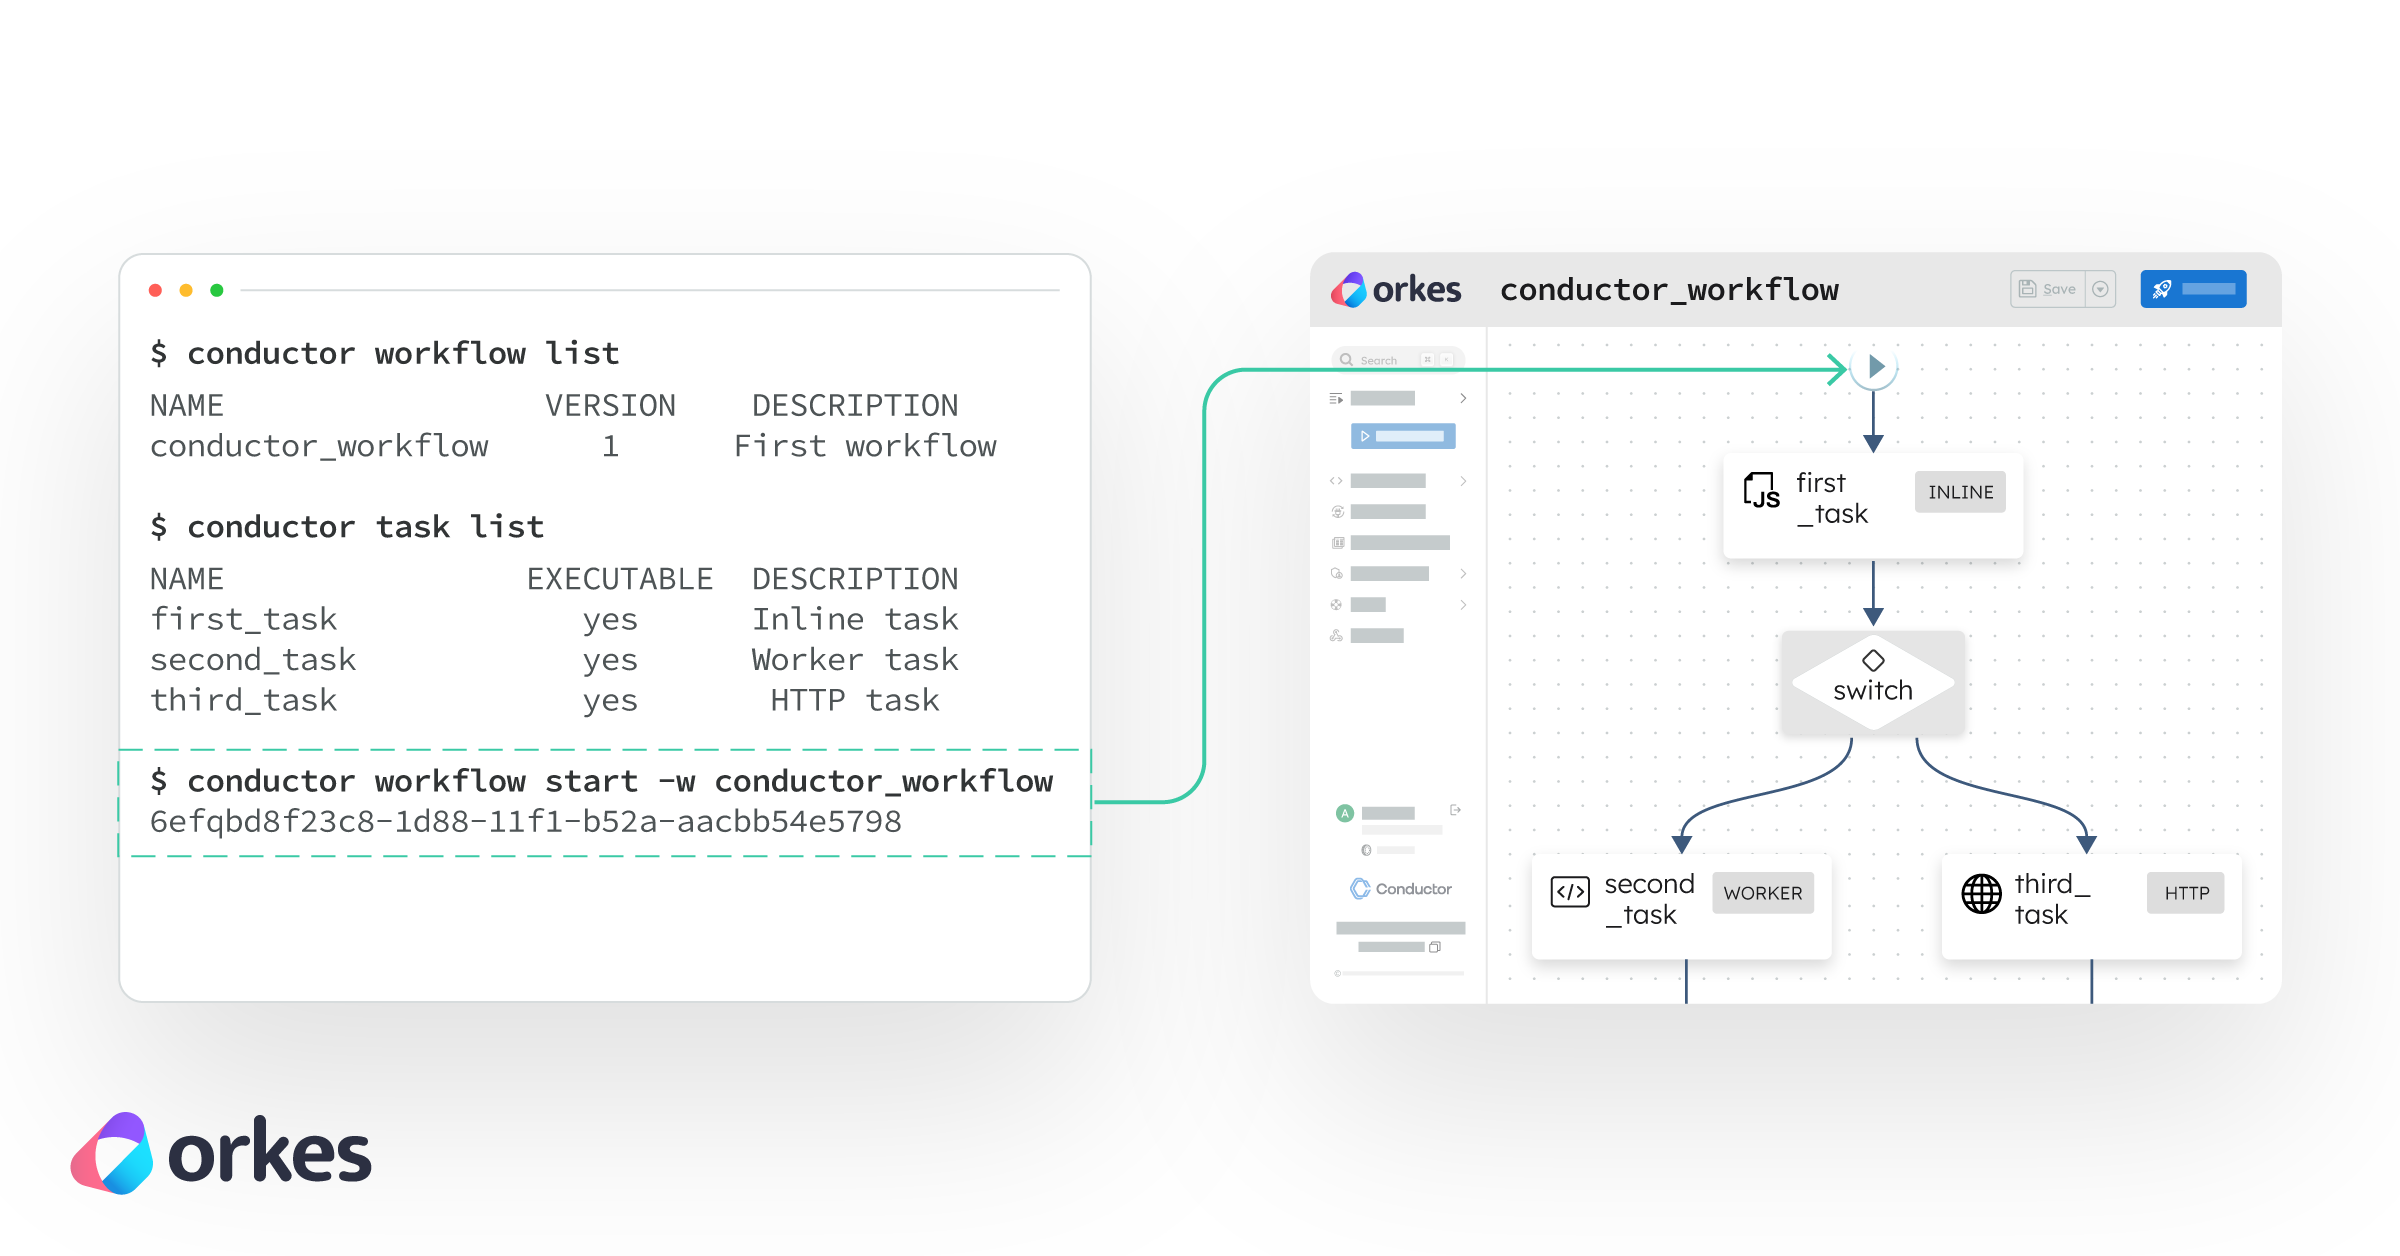
I'm using Node.js 18+, a free Orkes Developer Edition account at developer.orkescloud.com, and an OpenAI API key. And that's it 🙂. The Developer Edition gives you a fully hosted Conductor cluster with no infrastructure to set up and nothing to deploy. It's my favorite way to get started. We'll also run about six commands in total to get this thing going.
✨ If you choose to follow along and build this out, feel free to tag me on LinkedIn or use the orkesconductor hashtag (#orkesconductor). ✨
| Requirement | Notes |
|---|---|
| Node.js 18+ | Check with node --version |
| An Orkes Developer Edition account | Free at developer.orkescloud.com |
| An OpenAI (or other LLM) API key | Configured in Orkes Integrations — more on this below |
| A terminal you're comfortable in | We'll run 5–6 commands total |
Here's what we're building towards. Five files, each with one clear job:
support-ticket-triage/
├── package.json
├── tsconfig.json
├── .env
└── src/
    ├── config.ts
    ├── register-task-defs.ts
    ├── register-workflow.ts
    ├── workers.ts
    └── run-sample.ts
config.ts creates the authenticated Conductor client and exports it everywhere.register-task-defs.ts and register-workflow.ts do exactly what their names say. They register tasks and a workflow to your Orkes Conductor cluster so that Orkes Conductor knows about them. Essentially saves them there.workers.ts is where your actual business logic lives.run-sample.ts fires a test email through the whole thing so you can see it work.I'm going to go over the steps on how you can build one. You can either follow along or just read through it. I'll make sure to document how I build something like this though just in case you want to also do that.
This is where all your code will live. :)
Start from your terminal. Three commands and you have a home for this project:
mkdir support-ticket-triage
cd support-ticket-triage
mkdir src
Install the Orkes Conductor JavaScript SDK, dotenv for environment variables, and tsx so we can run TypeScript directly without a separate build step:
npm init -y
npm install @io-orkes/conductor-javascript dotenv
npm install -D typescript tsx
Then open package.json and replace its contents with this. The scripts block is what lets us run each piece of the project with a simple npm run command:
{
  "name": "support-ticket-triage",
  "version": "1.0.0",
  "private": true,
  "type": "module",
  "scripts": {
    "register:tasks": "tsx src/register-task-defs.ts",
    "register:workflow": "tsx src/register-workflow.ts",
    "workers": "tsx src/workers.ts",
    "run:sample": "tsx src/run-sample.ts"
  },
  "dependencies": {
    "@io-orkes/conductor-javascript": "^3.0.2",
    "dotenv": "^16.4.5"
  },
  "devDependencies": {
    "tsx": "^4.19.2",
    "typescript": "^5.6.3"
  }
}
Create tsconfig.json in the root. Nothing unusual here - we're targeting ES2022 and using Bundler module resolution which plays nicely with tsx:
{
  "compilerOptions": {
    "target": "ES2022",
    "module": "ESNext",
    "moduleResolution": "Bundler",
    "strict": true,
    "esModuleInterop": true,
    "skipLibCheck": true,
    "forceConsistentCasingInFileNames": true,
    "outDir": "dist"
  },
  "include": ["src/**/*.ts"]
}
Before writing any more code, we need somewhere to run it. This is the only setup step that happens outside your editor. Develoepr Edition is a super easy way to get started, but you can also set up Conductor locally.
In Developer Edition, go to Access Control -> Applications and create a new application. Call it whatever you want - I used support-triage-demo. The important part is the permissions: make sure it has Worker and Metadata API access. Without those two, you can't register task definitions, register workflows, or poll for tasks from code.
Once that's done, click Create access key and copy the key ID and secret somewhere safe. You'll need them in the next step.
Go to Integrations and add your LLM provider. Give it a name you'll recognise - I called mine MariaOpenAI. You'll reference that exact name later in the workflow definition, so make a note of it. I'm using gpt-4o as the model, but any model that returns clean JSON will work.
Create a .env file in the project root. This is where your credentials live so they never end up in your code:
CONDUCTOR_SERVER_URL=https://developer.orkescloud.com/api
CONDUCTOR_AUTH_KEY=your-key-id
CONDUCTOR_AUTH_SECRET=your-key-secret

LLM_PROVIDER=ProviderName
LLM_MODEL=gpt-4o

OWNER_EMAIL=your.name@yourcompany.io
Add .env to your .gitignore right now. Don't wait until after you've pushed. You'll forget amidts all the excitement and accidentally push your secret keys where people can find them.
Create src/config.ts:
import dotenv from "dotenv";
import { orkesConductorClient } from "@io-orkes/conductor-javascript";

dotenv.config();

const CONDUCTOR_SERVER_URL = process.env.CONDUCTOR_SERVER_URL;
const CONDUCTOR_AUTH_KEY = process.env.CONDUCTOR_AUTH_KEY;
const CONDUCTOR_AUTH_SECRET = process.env.CONDUCTOR_AUTH_SECRET;

const OWNER_EMAIL = process.env.OWNER_EMAIL || "maria.shimkovska@orkes.io";
const LLM_PROVIDER = process.env.LLM_PROVIDER || "MariaOpenAI";
const LLM_MODEL = process.env.LLM_MODEL || "chatgpt-4o-latest";

export async function getClient() {
  if (!CONDUCTOR_SERVER_URL || !CONDUCTOR_AUTH_KEY || !CONDUCTOR_AUTH_SECRET) {
    throw new Error("Missing required Conductor environment variables");
  }

  return orkesConductorClient({
    serverUrl: CONDUCTOR_SERVER_URL,
    keyId: CONDUCTOR_AUTH_KEY,
    keySecret: CONDUCTOR_AUTH_SECRET,
  });
}

export {
  CONDUCTOR_SERVER_URL,
  CONDUCTOR_AUTH_KEY,
  CONDUCTOR_AUTH_SECRET,
  OWNER_EMAIL,
  LLM_PROVIDER,
  LLM_MODEL,
};
Nothing fancy here either. This file reads your environment variables, validates that the required ones are present, and exports an authenticated client. Every other file in this project imports from here instead of repeating the connection logic.
This is where the AI part actually lives. In Developer Edition, navigate to the AI Prompts section and create a new prompt called ticket_triage_analyzer. Or you can call it something else, I will not be there to judge.
The most important thing about this prompt is telling the model exactly what format to return - and being aggressive about it. Left to their own devices, LLMs will wrap JSON in markdown code fences, add a friendly preamble, or make up fields. None of that is useful here. Be direct:
You are an expert support ticket triage agent for Company X's shipment label software.

Your job is to analyze an incoming support email and return ONLY valid JSON.
You will take in a user's email.

Do not use markdown.
Do not wrap the output in code fences.
Do not include any text before or after the JSON.
If a value is unknown, use null.
Do not invent facts.

Return JSON with exactly these fields:
{
  "customerName": "string | null",
  "customerEmail": "string | null",
  "subject": "string",
  "issueDescription": "string",
  "isCertificateIssue": true,
  "isExistingCustomer": true,
  "priority": "low | medium | high | critical",
  "sentiment": "positive | neutral | negative | frustrated",
  "routingKey": "team1 | team2",
  "suggestedTeam": "Certificate Support | General Technical Support",
  "reasoning": "string"
}

Rules:
- routingKey must be "team1" only if the email is about a certificate issue AND the sender appears to be an existing customer.
- otherwise routingKey must be "team2".
You can copy this prompt, or create your own that is specific to your use case and pain point. This is where you tell the AI what to do.
Create another file: src/register-task-defs.ts and paste the following code. This registers all four task definitions through the Conductor API using the JavaScript SDK. So that Conductor knows they are there and can use and call them as part of your workflow basically.
import { MetadataClient, taskDefinition } from "@io-orkes/conductor-javascript";
import { OWNER_EMAIL, getClient } from "./config.js";

async function main() {
  const client = await getClient();
  const metadata = new MetadataClient(client);

  const tasks = [
    taskDefinition({
      name: "assign_to_team1",
      description: "Creates a clean support record for Team 1 (Certificate Support).",
      ownerEmail: OWNER_EMAIL,
      retryCount: 2,
      timeoutSeconds: 300,
      responseTimeoutSeconds: 60,
    }),
    taskDefinition({
      name: "notify_team1",
      description: "Sends a notification payload for Team 1.",
      ownerEmail: OWNER_EMAIL,
      retryCount: 2,
      timeoutSeconds: 300,
      responseTimeoutSeconds: 60,
    }),
    taskDefinition({
      name: "assign_to_team2",
      description: "Creates a clean support record for Team 2 (General Technical Support).",
      ownerEmail: OWNER_EMAIL,
      retryCount: 2,
      timeoutSeconds: 300,
      responseTimeoutSeconds: 60,
    }),
    taskDefinition({
      name: "notify_team2",
      description: "Sends a notification payload for Team 2.",
      ownerEmail: OWNER_EMAIL,
      retryCount: 2,
      timeoutSeconds: 300,
      responseTimeoutSeconds: 60,
    }),
  ];

  for (const task of tasks) {
    await metadata.registerTask(task);
    console.log(`Registered task definition: ${task.name}`);
  }
}

main().catch((err) => {
  console.error(err);
  process.exit(1);
});
Ok so this is the heart of the whole thing in my opinion.
The workflow definition is where you tell Conductor what tasks to run and in what order. The AI task comes first, then the SWITCH task that reads its output and picks a branch. Each branch runs two worker tasks: assign and notify.
Create src/register-workflow.ts:
import { WorkflowExecutor, type WorkflowDef } from "@io-orkes/conductor-javascript";
import { getClient, OWNER_EMAIL, LLM_PROVIDER, LLM_MODEL } from "./config.js";

async function main() {
  const client = await getClient();
  const executor = new WorkflowExecutor(client);

  const workflowDef: WorkflowDef = {
    name: "customer_ticket_triage_agent",
    description:
      "Agentic workflow that automates support ticket triage for Company X's shipment label software. Extracts information from customer emails, classifies issues, and routes them to the correct support team.",
    version: 1,
    ownerEmail: OWNER_EMAIL,
    schemaVersion: 2,
    restartable: true,
    timeoutPolicy: "TIME_OUT_WF",
    timeoutSeconds: 3600,
    enforceSchema: true,
    inputParameters: ["emailFrom", "emailSubject", "emailBody"],
    tasks: [
      {
        name: "analyze_ticket",
        taskReferenceName: "analyze_ticket_ref",
        type: "LLM_CHAT_COMPLETE",
        inputParameters: {
          llmProvider: LLM_PROVIDER,
          model: LLM_MODEL,
          instructions: "ticket_triage_analyzer",
          messages: [
            {
              role: "user",
              message:
                "Analyze the incoming support email and return JSON only with these fields: customerName, customerEmail, subject, issueDescription, isCertificateIssue, isExistingCustomer, priority, sentiment, routingKey, suggestedTeam, reasoning. " +
                "routingKey must be team1 only for certificate issues from existing customers, otherwise team2.\n\n" +
                "From: ${workflow.input.emailFrom}\n" +
                "Subject: ${workflow.input.emailSubject}\n" +
                "Body: ${workflow.input.emailBody}",
            },
          ],
          temperature: 0.1,
          topP: 1,
          maxTokens: 500,
          jsonOutput: true,
        },
      },
      {
        name: "route_to_team",
        taskReferenceName: "route_to_team_ref",
        type: "SWITCH",
        evaluatorType: "value-param",
        expression: "routingKey",
        inputParameters: {
          routingKey: "${analyze_ticket_ref.output.result.routingKey}",
        },
        decisionCases: {
          team1: [
            {
              name: "assign_to_team1",
              taskReferenceName: "assign_to_team1_ref",
              type: "SIMPLE",
              inputParameters: {
                triage: "${analyze_ticket_ref.output.result}",
                originalEmail: {
                  from: "${workflow.input.emailFrom}",
                  subject: "${workflow.input.emailSubject}",
                  body: "${workflow.input.emailBody}",
                },
              },
            },
            {
              name: "notify_team1",
              taskReferenceName: "notify_team1_ref",
              type: "SIMPLE",
              inputParameters: {
                triage: "${analyze_ticket_ref.output.result}",
                team: "Certificate Support",
                assignedTicketId: "${assign_to_team1_ref.output.ticketId}",
              },
            },
          ],
          team2: [
            {
              name: "assign_to_team2",
              taskReferenceName: "assign_to_team2_ref",
              type: "SIMPLE",
              inputParameters: {
                triage: "${analyze_ticket_ref.output.result}",
                originalEmail: {
                  from: "${workflow.input.emailFrom}",
                  subject: "${workflow.input.emailSubject}",
                  body: "${workflow.input.emailBody}",
                },
              },
            },
            {
              name: "notify_team2",
              taskReferenceName: "notify_team2_ref",
              type: "SIMPLE",
              inputParameters: {
                triage: "${analyze_ticket_ref.output.result}",
                team: "General Technical Support",
                assignedTicketId: "${assign_to_team2_ref.output.ticketId}",
              },
            },
          ],
        },
        defaultCase: [
          {
            name: "assign_to_team2",
            taskReferenceName: "assign_to_team2_default_ref",
            type: "SIMPLE",
            inputParameters: {
              triage: "${analyze_ticket_ref.output.result}",
              originalEmail: {
                from: "${workflow.input.emailFrom}",
                subject: "${workflow.input.emailSubject}",
                body: "${workflow.input.emailBody}",
              },
            },
          },
          {
            name: "notify_team2",
            taskReferenceName: "notify_team2_default_ref",
            type: "SIMPLE",
            inputParameters: {
              triage: "${analyze_ticket_ref.output.result}",
              team: "General Technical Support",
              assignedTicketId: "${assign_to_team2_default_ref.output.ticketId}",
            },
          },
        ],
      },
    ],
  };

  await executor.registerWorkflow(true, workflowDef);
  console.log(`Registered workflow: ${workflowDef.name} v${workflowDef.version}`);
}

main().catch((err) => {
  console.error(err);
  process.exit(1);
});
Worth pausing on the SWITCH task for a second. It reads the routingKey from the AI task's output and picks a branch based on the value. If the model returns something unexpected, the defaultCase catches it and routes to Team 2. That's your safety net.
Workers are where your actual business logic runs. Each worker polls Conductor for a specific task, executes when one arrives, and returns a result. We're using the TypeScript 5.0+ class decorator style - the @worker decorator on each method tells the SDK which task to poll for, with concurrency and poll interval configured right there in the decorator. Clean and easy to read.
Create src/workers.ts:
import { randomUUID } from "node:crypto";
import { worker, TaskHandler } from "@io-orkes/conductor-javascript";
import type { Task } from "@io-orkes/conductor-javascript";
import { getClient } from "./config.js";

type Triage = {
  customerName: string | null;
  customerEmail: string | null;
  subject: string;
  issueDescription: string;
  isCertificateIssue: boolean;
  isExistingCustomer: boolean;
  priority: "low" | "medium" | "high" | "critical";
  sentiment: "positive" | "neutral" | "negative" | "frustrated";
  routingKey: "team1" | "team2";
  suggestedTeam: "Certificate Support" | "General Technical Support";
  reasoning: string;
};

function buildTicketId(prefix: string): string {
  return `${prefix}-${randomUUID().slice(0, 8)}`;
}

class SupportWorkers {
  @worker({ taskDefName: "assign_to_team1", concurrency: 10, pollInterval: 200 })
  async assignToTeam1(task: Task) {
    const triage = task.inputData?.triage as Triage;
    const ticketId = buildTicketId("CERT");

    const ticket = {
      ticketId,
      queue: "certificate-support",
      team: "Certificate Support",
      customerName: triage.customerName,
      customerEmail: triage.customerEmail,
      subject: triage.subject,
      summary: triage.issueDescription,
      priority: triage.priority,
      category: triage.isCertificateIssue ? "certificate" : "general",
      createdAt: new Date().toISOString(),
    };

    console.log("[assign_to_team1] created ticket", ticket);
    return { status: "COMPLETED" as const, outputData: ticket };
  }

  @worker({ taskDefName: "notify_team1", concurrency: 10, pollInterval: 200 })
  async notifyTeam1(task: Task) {
    const triage = task.inputData?.triage as Triage;
    const assignedTicketId = task.inputData?.assignedTicketId as string;

    const notification = {
      sent: true,
      team: "Certificate Support",
      assignedTicketId,
      message: `New certificate-related ticket ready for review: ${assignedTicketId}`,
      priority: triage.priority,
      createdAt: new Date().toISOString(),
    };

    console.log("[notify_team1] notification", notification);
    return { status: "COMPLETED" as const, outputData: notification };
  }

  @worker({ taskDefName: "assign_to_team2", concurrency: 10, pollInterval: 200 })
  async assignToTeam2(task: Task) {
    const triage = task.inputData?.triage as Triage;
    const ticketId = buildTicketId("GEN");

    const ticket = {
      ticketId,
      queue: "general-technical-support",
      team: "General Technical Support",
      customerName: triage.customerName,
      customerEmail: triage.customerEmail,
      subject: triage.subject,
      summary: triage.issueDescription,
      priority: triage.priority,
      category: triage.isCertificateIssue ? "certificate-prospect-or-other" : "general",
      createdAt: new Date().toISOString(),
    };

    console.log("[assign_to_team2] created ticket", ticket);
    return { status: "COMPLETED" as const, outputData: ticket };
  }

  @worker({ taskDefName: "notify_team2", concurrency: 10, pollInterval: 200 })
  async notifyTeam2(task: Task) {
    const triage = task.inputData?.triage as Triage;
    const assignedTicketId = task.inputData?.assignedTicketId as string;

    const notification = {
      sent: true,
      team: "General Technical Support",
      assignedTicketId,
      message: `New technical support ticket ready for review: ${assignedTicketId}`,
      priority: triage.priority,
      createdAt: new Date().toISOString(),
    };

    console.log("[notify_team2] notification", notification);
    return { status: "COMPLETED" as const, outputData: notification };
  }
}

async function main() {
  const client = await getClient();

  // Instantiating the class fires the decorators, registering all four workers
  void new SupportWorkers();

  const handler = new TaskHandler({
    client,
    scanForDecorated: true,
  });

  await handler.startWorkers();
  console.log("TaskHandler is polling for support-triage workers");

  process.on("SIGTERM", async () => {
    await handler.stopWorkers();
    process.exit(0);
  });
}

main().catch((err) => {
  console.error(err);
  process.exit(1);
});
Right now the workers just log structured output - no external integrations yet. That's intentional. It makes the whole thing easy to run and verify locally before you connect Jira or Slack. When you're ready to add those, only the worker functions change. The workflow definition stays exactly as it is.
This script starts a workflow execution with a real-looking email and then polls the status every 1.5 seconds until it completes. It's how we'll verify the whole thing works end to end.
Create src/run-sample.ts:
import { WorkflowExecutor } from "@io-orkes/conductor-javascript";
import { getClient } from "./config.js";

async function runExample(input: {
  emailFrom: string;
  emailSubject: string;
  emailBody: string;
}) {
  const client = await getClient();
  const executor = new WorkflowExecutor(client);

  const workflowId = await executor.startWorkflow({
    name: "customer_ticket_triage_agent",
    version: 1,
    input,
  });

  console.log("Started workflow:", workflowId);

  for (let i = 0; i < 20; i++) {
    await new Promise((resolve) => setTimeout(resolve, 1500));
    const status = await executor.getWorkflowStatus(workflowId, true, true);
    console.log(`Poll ${i + 1}:`, status.status);

    if (
      status.status === "COMPLETED" ||
      status.status === "FAILED" ||
      status.status === "TERMINATED" ||
      status.status === "TIMED_OUT"
    ) {
      console.log(JSON.stringify(status.output, null, 2));
      return;
    }
  }

  console.log("Workflow is still running; check it in the Conductor UI.");
}

async function main() {
  await runExample({
    emailFrom: "ops@acme-logistics.com",
    emailSubject: "URGENT: production certificates expired and shipping is blocked",
    emailBody: `
Hi team,

We are an existing customer and our production environment is failing this morning.
Our shipment-label service is blocked because the production certificate appears to have expired.

Users cannot generate labels.
Please help ASAP.

Thanks,
Nina
Operations Manager
`.trim(),
  });
}

main().catch((err) => {
  console.error(err);
  process.exit(1);
});
Now we start actually running things. Task definitions need to be registered before the workflow, because the workflow references them by name.
npm run register:tasks
You should see:
Registered task definition: assign_to_team1
Registered task definition: notify_team1
Registered task definition: assign_to_team2
Registered task definition: notify_team2
If this fails, don't move on. Fix it here first. Everything else depends on these being present.
npm install -g @conductor-oss/conductor-cli
export CONDUCTOR_SERVER_URL=https://developer.orkescloud.com/api
export CONDUCTOR_AUTH_KEY=<your-key-id>
export CONDUCTOR_AUTH_SECRET=<your-key-secret>
conductor task list
conductor task get assign_to_team2
Now register the workflow definition itself:
npm run register:workflow
Registered workflow: customer_ticket_triage_agent v1
You can also verify it pretty quickly with the CLI.
conductor workflow get customer_ticket_triage_agent
Open a second terminal window, navigate to the project folder, and start the workers:
npm run workers
And if everything looks great you will see this output:
INFO TaskWorker assign_to_team1 initialized with concurrency of 10 and poll interval of 200
INFO TaskWorker notify_team1 initialized with concurrency of 10 and poll interval of 200
INFO TaskWorker assign_to_team2 initialized with concurrency of 10 and poll interval of 200
INFO TaskWorker notify_team2 initialized with concurrency of 10 and poll interval of 200
TaskHandler is polling for support-triage workers
Keep this terminal open and running. Your workers are now live, polling Conductor for tasks to execute.
Ok. So back in your first terminal run the following:
npm run run:sample
Started workflow: 6efqd6d65475-1c98-11f1-8319-06889f66d015
Poll 1: RUNNING
Poll 2: RUNNING
Poll 3: COMPLETED
{
  "triage": {
    "customerName": "Nina",
    "customerEmail": "ops@acme-logistics.com",
    "subject": "URGENT: production certificates expired and shipping is blocked",
    "issueDescription": "Our shipment-label service is blocked because the production certificate appears to have expired. Users cannot generate labels.",
    "isCertificateIssue": true,
    "isExistingCustomer": true,
    "priority": "critical",
    "sentiment": "frustrated",
    "routingKey": "team1",
    "suggestedTeam": "Certificate Support",
    "reasoning": "The email indicates that the customer is existing, and it is a critical certificate issue affecting production environment."
  },
  "routingKey": "team1"
}
Try changing the email body to a generic login issue, or a certificate question from someone who doesn't identify as an existing customer. It should route to Team 2 instead. That's the branching logic doing its job.
This workflow is a foundation, not a finished product. Once it's running, here's what I'd add next.
A validation step right after the AI task, to catch cases where the model returns something malformed before it reaches your routing logic. A human review task for tickets that come back ambiguous - Conductor has a built-in HUMAN task type designed exactly for this. Real integrations inside the workers: swap the log statements for Jira ticket creation, a Slack message to the right channel, or a PagerDuty alert for anything critical. And more routing branches as your support org grows - the SWITCH task scales to as many teams as you need. The core pattern doesn't change across any of those. The AI reads the email. Conductor decides what happens next. That separation is what makes the whole thing easy to extend.
The most important thing is to build out your own logic where the SIMPLE tasks are. But this shows you how you can build out an agentic workflow to automate something like this.
For the extra curious folks out there:
It's when software reads your incoming support emails, figures out what each one is about, and sends it to the right team so no one has to do that sorting by hand.
You use an LLM to read the messy email and turn it into clean, structured data with a routing key. Then an orchestration tool like Orkes Conductor looks at that key and decides what to run next. The AI reads; Conductor acts.
An LLM task calls an AI model - Conductor handles that for you, no custom code needed. A worker task is code you write yourself that does something specific, like creating a ticket or sending a notification. In this project, the LLM task reads the email and the worker tasks handle everything after that.
Yes. Just change the llmProvider and model values in your workflow definition and update your .env file. Orkes supports multiple providers.
Yes - this is the entire point and what makes this workflow super useful. Right now the workers just log output for an easy example. You can swap that out for any API call you want. The workflow stays exactly the same.
No. Orkes Developer Edition is fully hosted. You just run the workers on your laptop and they connect to Conductor over HTTPS. If you are curious about
All four task definitions appear in conductor task list
conductor workflow get customer_ticket_triage_agentIf all are checked, you've got a working AI-powered triage workflow running locally with retries and error handling and all the cool stuff that comes from having an orchestrator have your back. Not bad for a few hundred lines of code if you ask me. 👀